Wouldn't it be nice to just sit at your buddy's house, plug into his network, and see exactly what he's doing? What if it was as easy as that? What makes packet sniffers like Wireshark such potent tools is that a majority of local area networks (LANs) are based on the shared Ethernet notion.
In a shared Ethernet, you can think of all of the computers in a LAN as being plugged into the same wire, and all of the traffic that travels through it can be captured. Packet sniffers are more formally known as network analyzers and protocol analyzers. But what traffic are we talking about?
Everything. Granted encrypted data will be unreadable to you, you can still see it, and anything that is sent plain text (not encrypted) can be grabbed very easily. This includes passwords, logins, instant messaging conversations, emails, etc. Everything.
For example, assume that your network card picks up a packet from someone else's network. Normally, once the packet is handed off, the operating system must determine exactly what type of packet it is. To do so, it strips off the Ethernet header of the packet and looks at the next layer. Perhaps it's an IP packet.. Well, the OS must now strip of the IP header and determine which type of IP packet it is. Finally, let's say it's determined that the packet is a UDP packet. The UDP header is stripped off and the packet payload (the data) is handed over to the application that the packet was sent to.
Now, this is an oversimplified version of what really goes on, but I'm trying to illustrate a point. Packet capture allows us to intercept any packet that is seen by the network device, and grab it in its entirety, headers and all. Regardless of which port is being sent to, or even which host, for that matter.
Before we get into grabbing frames and causing mayhem for lulz, we need to explain what a packet is and the concept of a frame. I believe knowing how something works is much better than just learning to do it, so let's dive into some networking!
The model is divided into seven layers, as shown below. If you are serious about learning networking and information security, my advice is to memorize this image. I know it looks long and complicated at first, and trust me it is. But the more you use this (and you will) the faster it will come to you.
The reason for using a layered networking approach is that a layered model takes a task, such as data communications, and breaks it into a series of tasks, activities or components, each of which is defined and developed independently. OSI layers also allow extensibility. New protocols and other network services are generally easier to add to a layered architecture.
The basic idea behind the OSI reference model is this—Each layer is in charge of some kind of processing and each layer only talks to the layers immediately below and above it. For example, the sixth layer will only talk to the seventh and fifth layers, and never directly with the first layer. Remember this and it gets easy.
When your computer is transmitting data to the network, one given layer will receive data from the layer above, process what it received, add some control information to the data that this particular layer is in charge of, and send the new data with this new control information added to the layer below.
When your computer is receiving data, the contrary process will occur. One given layer will receive data from the layer below, process what it received, remove control information from the data that this particular layer is in charge of, and send the new data without the control information to the layer above.
What's important to keep in mind is that each layer will add or remove control information that it is in charge of. An acronym to help remember the model from bottom to top is "Please Do Not Throw Sausage Pizza Away."
Now, think of an IP address like a person's mailing address. The mailing address groups people into zones by using the zip code, city, state, and street identifiers.
The most important part of understanding this third layer is knowing that routers make decisions based on layer three's information. Routers are machines that decide how to send information from one logical network to another. Routers understand the Internet Protocol (IP) and base routing decisions on that information.
Another way to look at it—picture your computer. You're browsing the web, downloading from an FTP server, streaming some music, and who knows what else, all at the same time. All that data is coming into your computer, but it would make little sense if the FTP data was being sent to your Pandora tab, wouldn't it? It's in this layer that ports are used and that data is properly directed.
This layer is mainly concerned with the syntax and semantics of the information transmitted. For outgoing messages, it converts data into a generic format for the transmission. For the incoming messages, it converts the data to a format understandable to the receiving application. This layer also formats and encrypts data to be sent across a network, providing freedom from compatibility problems and issues.
Common services that will seem familiar include streaming music, email, and online games. When you think of the application layer, think of just that—applications.
Free BSD users can type:
$ sudo pkg_add -r wireshark
Debian-based systems can type:
$ sudo apt-get install wireshark
Arch users can type:
$ sudo pacman -S wireshark-gtk
If you do wish to compile from source, follow along below:
Download the source code with Wget and compile it up.
$ wget http://www.tcpdump.org/release/libpcap-1.2.1.tar.gz
$ wget http://ftp.gnome.org/pub/gnome/sources/glib/2.30/glib-2.30.2.tar.bz2
$ wget http://ftp.gnome.org/pub/gnome/sources/gtk+/3.2/gtk+-3.2.2.tar.bz2
Windows users can grab the 32-bit and 64-bit versions of Wireshark. Linux users can simply retrieve the source code by typing:
$ wget http://wiresharkdownloads.riverbed.com/wireshark/src/wireshark-1.6.5.tar.bz2
$ ./configure
$ sudo make
$ sudo make install
To get started, let's type:
$ tar xvjf wireshark-1.6.5.tar.bz2 && cd wireshark-1.6.5
$ ./configure
$ sudo make
$ sudo make install
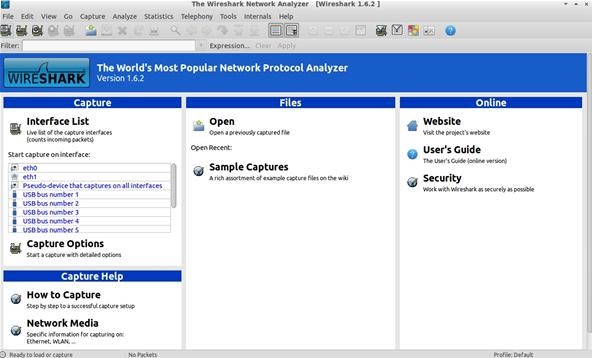
You'll see a section titled Capture Help—I highly encourage first time users to give it a whirl. Also notice that if you had captured packets on another computer, you could import that file into Wireshark for analysis, as well.
Under Capture, it lists all the interfaces on your system Wireshark can use to listen in on. /dev/eth1 is my wireless interface, so let's click on that.
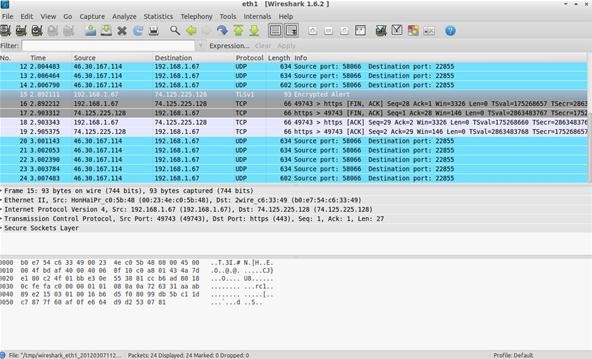
Here, we listened in on the interface only for a few seconds and picked up 24 packets. The first column lists the packet number, ordered in how they were received. The next column lists the time in seconds, which began when Wireshark started that session.
Next to that lists the Protocol of the packets received. Notice in the image where it says TLSv1 and Encrypted Alert in the info status? TLS stands for Transport Layer Security and if you remember from above, it runs on the transport layer.

Here you can see the protocol is DNS. The first packet is querying the server and the second packet is responding.
More importantly than that, you have a good intro to the OSI Model in your mind. I cannot stress enough that understanding this concept will help you later on down the road.
In a shared Ethernet, you can think of all of the computers in a LAN as being plugged into the same wire, and all of the traffic that travels through it can be captured. Packet sniffers are more formally known as network analyzers and protocol analyzers. But what traffic are we talking about?
Everything. Granted encrypted data will be unreadable to you, you can still see it, and anything that is sent plain text (not encrypted) can be grabbed very easily. This includes passwords, logins, instant messaging conversations, emails, etc. Everything.
For example, assume that your network card picks up a packet from someone else's network. Normally, once the packet is handed off, the operating system must determine exactly what type of packet it is. To do so, it strips off the Ethernet header of the packet and looks at the next layer. Perhaps it's an IP packet.. Well, the OS must now strip of the IP header and determine which type of IP packet it is. Finally, let's say it's determined that the packet is a UDP packet. The UDP header is stripped off and the packet payload (the data) is handed over to the application that the packet was sent to.
Now, this is an oversimplified version of what really goes on, but I'm trying to illustrate a point. Packet capture allows us to intercept any packet that is seen by the network device, and grab it in its entirety, headers and all. Regardless of which port is being sent to, or even which host, for that matter.
Before we get into grabbing frames and causing mayhem for lulz, we need to explain what a packet is and the concept of a frame. I believe knowing how something works is much better than just learning to do it, so let's dive into some networking!
The Open Source Interconnection (OSI) Model
The OSI model is a layered model that describes how information moves from an application running on one networked computer to an application running on another networked computer. Think of it this way, the OSI model describes the steps to be used to transfer data from one networked device to another. Easy.The model is divided into seven layers, as shown below. If you are serious about learning networking and information security, my advice is to memorize this image. I know it looks long and complicated at first, and trust me it is. But the more you use this (and you will) the faster it will come to you.
The reason for using a layered networking approach is that a layered model takes a task, such as data communications, and breaks it into a series of tasks, activities or components, each of which is defined and developed independently. OSI layers also allow extensibility. New protocols and other network services are generally easier to add to a layered architecture.
The basic idea behind the OSI reference model is this—Each layer is in charge of some kind of processing and each layer only talks to the layers immediately below and above it. For example, the sixth layer will only talk to the seventh and fifth layers, and never directly with the first layer. Remember this and it gets easy.
When your computer is transmitting data to the network, one given layer will receive data from the layer above, process what it received, add some control information to the data that this particular layer is in charge of, and send the new data with this new control information added to the layer below.
When your computer is receiving data, the contrary process will occur. One given layer will receive data from the layer below, process what it received, remove control information from the data that this particular layer is in charge of, and send the new data without the control information to the layer above.
What's important to keep in mind is that each layer will add or remove control information that it is in charge of. An acronym to help remember the model from bottom to top is "Please Do Not Throw Sausage Pizza Away."
Layer 1: Physical
The physical layer describes the physical medium that data travels through. Think Ethernet cables, Network Interface Controllers, and things of the like. It also provides the interface between network and network communication devices.Layer 2: Datalink
The datalink layer is where the network packets are translated into raw bits (00110101) to be transmitted on the physical layer. This is also a layer that uses the most basic addressing scheme, Media Access Control addresses. Think of a MAC address like a diver's license number—it's just a number that is unique from anyone else's.Now, think of an IP address like a person's mailing address. The mailing address groups people into zones by using the zip code, city, state, and street identifiers.
Summary of Layer 1 and 2
When a network card receives a stream of bits over the network, it receives the data from the wires (the first layer), then the second layer is responsible for making sense of these 1s and 0s. The second layer first checks the destination MAC address in the frame to make sure the data was intended for that computer. If the destination MAC address matches the MAC address of the network card, it carries on.Layer 3: Network
The network layer determines how data transmits between network devices. It also translates the logical address into the physical address (computer name into MAC address). It's also responsible for defining the route, managing network problems, and addressing. Routers also work on the network layer.The most important part of understanding this third layer is knowing that routers make decisions based on layer three's information. Routers are machines that decide how to send information from one logical network to another. Routers understand the Internet Protocol (IP) and base routing decisions on that information.
Layer 4: Transport
The transport layer accepts data from the session layer and breaks it into packets and delivers these packets to the network layer. It's the responsibility of the transport layer to guarantee successful arrival of data at the destination device. Transport Layer Security also runs on this layer.Layer 5: Session
The session layer manages the setting up and taking down of the association between two communicating end points, called a connection. A connection is maintained while the two end points are communicating back and forth.Another way to look at it—picture your computer. You're browsing the web, downloading from an FTP server, streaming some music, and who knows what else, all at the same time. All that data is coming into your computer, but it would make little sense if the FTP data was being sent to your Pandora tab, wouldn't it? It's in this layer that ports are used and that data is properly directed.
Layer 6: Presentation
The presentation layer resolves differences in data representation by translating from application to network format, and vice versa. It works to transform data into the form that the application layer can accept. Remember, each layer can only 'talk' to the layer above and below it.This layer is mainly concerned with the syntax and semantics of the information transmitted. For outgoing messages, it converts data into a generic format for the transmission. For the incoming messages, it converts the data to a format understandable to the receiving application. This layer also formats and encrypts data to be sent across a network, providing freedom from compatibility problems and issues.
Layer 7: Application
The application layer is the top layer of the model. It provides a set of interfaces for applications to obtain access to networked services. This layer also provides application access security checking and information validation.Common services that will seem familiar include streaming music, email, and online games. When you think of the application layer, think of just that—applications.
Let's Steal Some Data!
Now that we have a grasp on the OSI model, we want to get into Wireshark. If you're running BackTrack, you already have this set up in your /pentest directory. Otherwise, let's go ahead and grab the packages. If you want the latest version of 1.6.5, you must download and compile the source code. If you don't mind the older 1.6.2 version, you can use the repositories. In this case, I recommend the repos if you feel shy about compiling from source and handling dependencies. If you want the bleeding edge, grab the source. As of this writing, it's a small difference.Free BSD users can type:
$ sudo pkg_add -r wireshark
Debian-based systems can type:
$ sudo apt-get install wireshark
Arch users can type:
$ sudo pacman -S wireshark-gtk
If you do wish to compile from source, follow along below:
Step 1 Get All The Required Packages
Make a new temporary directory, because we're going to download some files. Wireshark also requires libpcap, glib, and GTK+ as dependencies. Backtrack users should again be good to go, but others might need to get these packages first.Download the source code with Wget and compile it up.
$ wget http://www.tcpdump.org/release/libpcap-1.2.1.tar.gz
$ wget http://ftp.gnome.org/pub/gnome/sources/glib/2.30/glib-2.30.2.tar.bz2
$ wget http://ftp.gnome.org/pub/gnome/sources/gtk+/3.2/gtk+-3.2.2.tar.bz2
Windows users can grab the 32-bit and 64-bit versions of Wireshark. Linux users can simply retrieve the source code by typing:
$ wget http://wiresharkdownloads.riverbed.com/wireshark/src/wireshark-1.6.5.tar.bz2
Step 2 Build and Install the Dependencies
Untar each package you downloaded, then move into the new expanded directory and type the following for each:$ ./configure
$ sudo make
$ sudo make install
Step 3 Build and Install Wireshark
Now we can get to installing our network protocol analyzer, Wireshark. If you have any issues or problems at this stage with dependencies, check out this helpful link.To get started, let's type:
$ tar xvjf wireshark-1.6.5.tar.bz2 && cd wireshark-1.6.5
$ ./configure
$ sudo make
$ sudo make install
Step 4 Configure, Capture and Conquer
Now that we have everything up and running, let's go ahead and fire up Wireshark. We should be greeted with the following screen:You'll see a section titled Capture Help—I highly encourage first time users to give it a whirl. Also notice that if you had captured packets on another computer, you could import that file into Wireshark for analysis, as well.
Under Capture, it lists all the interfaces on your system Wireshark can use to listen in on. /dev/eth1 is my wireless interface, so let's click on that.
Here, we listened in on the interface only for a few seconds and picked up 24 packets. The first column lists the packet number, ordered in how they were received. The next column lists the time in seconds, which began when Wireshark started that session.
Source and Destination
The Source and Destination columns list the addresses contained in the header. You will notice packets that are addressed for you will show your internal IP address. This is because right now we are listening to the wireless traffic inside a network and as such, are behind the router. Packets coming to the receiving computer have already been stripped of the network IP address by the router. Remember how each layer of the OSI model can only talk to the layers above and below? That's because as the data travels up and down the layers, the control info is added to it, and stripped off as it passes.Next to that lists the Protocol of the packets received. Notice in the image where it says TLSv1 and Encrypted Alert in the info status? TLS stands for Transport Layer Security and if you remember from above, it runs on the transport layer.
Packet Overview
Under that lies an overview of the packet, giving you details such as size and what ports it was addressed to. Click on one of the entries and move your keyboard arrows up and down. See how the highlighted block of jumbled letters and numbers moves along with it? All those jumbled letters and numbers are actually hexadecimal code, and next to it is a quick decoded overview of the data. If items are being transmitted encrypted, then this won't be enough yet, but anything sent plain text will show up here.In Action
Here, I opened my browser and typed www.google.com into the bar. As I briefly explained in my darknet article, your computer sends a request to a DNS server to find out the IP associated with google.com. The server then returns the address back to you and your browser connects to it. We can see this in action by sniffing the traffic as it happens.Here you can see the protocol is DNS. The first packet is querying the server and the second packet is responding.
In Closing
Whew, that was a long read, but hopefully it was full of good knowledge. Sniffing traffic is useful for a multitude of reasons, from protecting your network from leaks by testing it out, to peeking at data that was not meant for your eyes. Next week, we'll get into advanced capturing of wireless packets, and dig into Wireshark a little more deeper.More importantly than that, you have a good intro to the OSI Model in your mind. I cannot stress enough that understanding this concept will help you later on down the road.
No comments:
Post a Comment